
테스트 검증기간중
운영-검증서버 간의 결과데이터를 비교해야하는 과제가 생겼습니다.
운영-검증간의 DB 구조는 동일하지만
데이터가 몇만건이 되다보니 하나하나 비교해가며
잘못된 데이터를 찾기에는 무리여서
DB연결, 조회쿼리만 짜놓으면
양쪽의 테이블 데이터를 자동으로 비교해주는 툴을 만들어보았습니다.
📌 다중 DB 연결
먼저 프로젝트 설정파일에 다중 DB를 연결할 수 있도록 DB관련 코드들부터 작성해줬습니다.
✔️ Config
👩💻 application.yml
server:
  port: 8080

spring:
  application:
    name: monitoring-tables
  config:
    activate:
      on-profile: local
  datasource:
    schema: solar
    driver-class-name: org.mariadb.jdbc.Driver
    url: jdbc:mariadb://기본접속db:db포트/solar?allowMultiQueries=true
    username: secret
    password: secret
    hikari:
      pool-name: eservice-dbcp-mysql
      maximum-pool-size: 2
  mvc:
#    static-path-pattern: /static/**
    throw-exception-if-no-handler-found: true

  profiles:
    maria:
      test:
        driver-class-name: org.mariadb.jdbc.Driver
        url: jdbc:mariadb://다중db?useUnicode=true&characterEncoding=utf-8&serverTimezone=UTC
        username: secret
        password: secret
      dev:
        driver-class-name: org.mariadb.jdbc.Driver
        url: jdbc:mariadb://다중db?useUnicode=true&characterEncoding=utf-8&serverTimezone=UTC
        username: secret
        password: secret
      prod:
        driver-class-name: org.mariadb.jdbc.Driver
        url: jdbc:mariadb://다중db?useUnicode=true&characterEncoding=utf-8&serverTimezone=UTC
        username: secret
        password: secret
    postgres:
      test:
        driver-class-name: net.sf.log4jdbc.sql.jdbcapi.DriverSpy
        url: jdbc:log4jdbc:postgresql://다중db?useUnicode=true&characterEncoding=utf-8&serverTimezone=UTC
        username: secret
        password: secret
      dev:
        driver-class-name: net.sf.log4jdbc.sql.jdbcapi.DriverSpy
        url: jdbc:log4jdbc:postgresql://다중db?useUnicode=true&characterEncoding=utf-8&serverTimezone=UTC
        username: secret
        password: secret
      prod:
        driver-class-name: net.sf.log4jdbc.sql.jdbcapi.DriverSpy
        url: jdbc:log4jdbc:postgresql://다중db?useUnicode=true&characterEncoding=utf-8&serverTimezone=UTC
        username: secret
        password: secret
    piggy2:
      test:
        driver-class-name: org.mariadb.jdbc.Driver
        url: jdbc:mariadb://다중db?useUnicode=true&characterEncoding=utf-8&serverTimezone=UTC
        password: secret
      local:
        driver-class-name: org.mariadb.jdbc.Driver
        url: jdbc:mariadb://다중db?useUnicode=true&characterEncoding=utf-8&serverTimezone=UTC
        username: secret
        password: secret
      dev:
        driver-class-name: org.mariadb.jdbc.Driver
        url: jdbc:mariadb://다중db?useUnicode=true&characterEncoding=utf-8&serverTimezone=UTC
        username: secret
        password: secret
      stg:
        driver-class-name: org.mariadb.jdbc.Driver
        url: jdbc:mariadb://다중db?useUnicode=true&characterEncoding=utf-8&serverTimezone=UTC
        username: secret
        password: secret
      prod:
        driver-class-name: org.mariadb.jdbc.Driver
        url: jdbc:mariadb://다중db?useUnicode=true&characterEncoding=utf-8&serverTimezone=UTC
        username: secret
        password: secret
👩💻 DataSourceConfig
application 설정파일에서 db설정으로 추가한 셋팅들을
dataSourceConfig쪽에 추가해야, 쿼리에서 텍스트로 db를 호출했을때 연결될 수 있습니다
import org.springframework.beans.factory.annotation.Autowired;
import org.springframework.boot.jdbc.DataSourceBuilder;
import org.springframework.context.annotation.Bean;
import org.springframework.context.annotation.Configuration;
import org.springframework.core.env.Environment;
import org.springframework.jdbc.datasource.DataSourceTransactionManager;

import javax.sql.DataSource;
import java.util.HashMap;
import java.util.Map;

@Configuration
public class DataSourceConfig {
    @Autowired
    private Environment environment;

    @Bean
    public DataSource dataSource() {
        // 동적으로 선택 가능한 라우팅 데이터 소스를 생성
        RouterDataSource routingDataSource = new RouterDataSource();

        // 기본 데이터 소스 설정
        DataSource mariaLocal = createDataSource("maria", "test");
        DataSource postgresLocal = createDataSource("postgres", "test");
        DataSource piggy2Local = createDataSource("piggy2", "test");

        Map<Object, Object> dataSources = new HashMap<>();

        // 추가적으로 필요한 데이터 소스를 초기 설정
        // test
        dataSources.put("maria_test", mariaLocal);
        dataSources.put("postgres_test", postgresLocal);
        dataSources.put("piggy2_test", piggy2Local);

        // local

        // dev
        dataSources.put("maria_dev", createDataSource("maria", "dev"));
        dataSources.put("postgres_dev", createDataSource("postgres", "dev"));
        dataSources.put("piggy2_dev", createDataSource("piggy2", "dev"));
        // stg
        dataSources.put("piggy2_stg", createDataSource("piggy2", "stg"));
        // prod
        dataSources.put("piggy2_prod", createDataSource("piggy2", "prod"));


        routingDataSource.setTargetDataSources(dataSources);
        routingDataSource.setDefaultTargetDataSource(mariaLocal); // 기본 데이터 소스 설정
        routingDataSource.afterPropertiesSet();

        return routingDataSource;
    }

    private DataSource createDataSource(String driver, String type) {
        // 환경설정 파일에서 데이터 소스 정보를 로드하기 위한 프로파일 Prefix 생성
        String prefix = "spring.profiles." + driver + "." + type;

        return DataSourceBuilder.create()
                .driverClassName(environment.getProperty(prefix + ".driver-class-name"))
                .url(environment.getProperty(prefix + ".url"))
                .username(environment.getProperty(prefix + ".username"))
                .password(environment.getProperty(prefix + ".password"))
                .build();
    }

    @Bean
    public DataSourceTransactionManager transactionManager(DataSource dataSource) {
        // 주입받은 DataSource로 DataSourceTransactionManager 생성
        return new DataSourceTransactionManager(dataSource);
    }
}
👩💻 MybatisConfig
연결되는 db에따라 적절하게, xml로 작성하는 query파일을 호출하기 위해 설정하는 부분입니다.
package net.herit.rookieV2.commons.config;

import org.apache.ibatis.session.SqlSessionFactory;
import org.mybatis.spring.SqlSessionFactoryBean;
import org.springframework.context.annotation.Bean;
import org.springframework.context.annotation.Configuration;
import org.springframework.core.io.support.PathMatchingResourcePatternResolver;

import javax.sql.DataSource;

@Configuration
public class MybatisConfig {
    @Bean
    public SqlSessionFactory sqlSessionFactory(DataSource dataSource) throws Exception {
        // DataSource를 설정하여 데이터베이스 연결 정보를 전달
        SqlSessionFactoryBean factoryBean = new SqlSessionFactoryBean();
        factoryBean.setDataSource(dataSource);

        // 기존 mapper-locations 설정 (기본 XML 파일들)
        factoryBean.setMapperLocations(
                new PathMatchingResourcePatternResolver()
                        .getResources("classpath:/mappers/*.xml"));

        // MyBatis Mapper에서 사용할 객체(Entity)들의 패키지 경로를 설정 (별칭으로 간단히 사용 가능)
        factoryBean.setTypeAliasesPackage("net/herit/rookieV2/features/*/dto/model/entity;" +
                "net/herit/rookieV2/commons/*/dto/model/entity");

        // 설정 완료된 SqlSessionFactory 객체 반환
        return factoryBean.getObject();
    }

    /**
     * 동적인 추가 SQL 매퍼 파일 로드를 위한 설정
     * 호출 드라이버별 연결될 query파일 매핑
     * @param driver 요청받은 driver (maria 또는 postgres)
     * @return 동적 매퍼 파일 경로
     */
    public String getDynamicMapper(String driver) {
        if ("maria".equalsIgnoreCase(driver)) {
            return "classpath:/mappers/tablespec_maria.xml";
        } else if ("postgres".equalsIgnoreCase(driver)) {
            return "classpath:/mappers/tablespec_postgres.xml";
        } else if ("piggy2".equalsIgnoreCase(driver)) {
            return "classpath:/mappers/query_piggy2.xml";
        } else {
            // 잘못된 드라이버 유형 입력 시 예외 발생
            throw new IllegalArgumentException("Invalid driver type: " + driver);
        }
    }
}
👩💻 RouterDataSource
Spring에서 다중 데이터소스를 설정하기 위해서, 동적 라우팅 데이터 소스를 작성합니다.
해당 클래스는 AbstractRoutingDataSource를 상속받아 동적으로 데이터베이스를 선택할 수 있도록 합니다.
import com.zaxxer.hikari.HikariDataSource;
import lombok.extern.slf4j.Slf4j;
import org.springframework.jdbc.datasource.lookup.AbstractRoutingDataSource;

import javax.sql.DataSource;
import java.util.Map;
import java.util.concurrent.ConcurrentHashMap;

/**
 * Spring에서 다중 데이터 소스를 설정하기 위해 `RouterDataSource`라는 동적 라우팅 데이터 소스를 도입합니다.
 * 이 클래스는 `AbstractRoutingDataSource`를 상속받아 동적으로 데이터베이스를 선택할 수 있도록 합니다.
 */
@Slf4j
public class RouterDataSource extends AbstractRoutingDataSource {
    private static final ThreadLocal<String> CONTEXT = new ThreadLocal<>();
    private final Map<Object, Object> customDataSources = new ConcurrentHashMap<>();

    /**
     * 현재 요청에 대한 라우팅 키를 반환
     */
    @Override
    protected Object determineCurrentLookupKey() {
        return CONTEXT.get();
    }

    /**
     * 라우팅 키 설정 (스레드 로컬)
     */
    public static void setRoutingKey(String key) {
        CONTEXT.set(key);
    }

    /**
     * 라우팅 키 초기화 (스레드 로컬에서 삭제)
     */
    public static void clearRoutingKey() {
        CONTEXT.remove();
    }

    /**
     * 동적으로 데이터 소스를 추가하는 메서드 (setCustomDataSource 지원).
     *
     * @param key        데이터 소스 식별 키
     * @param dataSource 추가할 HikariDataSource
     */
    public void addCustomDataSource(String key, HikariDataSource dataSource) {
        if (key == null || key.isEmpty()) {
            throw new IllegalArgumentException("데이터 소스 키는 null이거나 비어 있을 수 없습니다.");
        }
        if (dataSource == null) {
            throw new IllegalArgumentException("데이터 소스 객체는 null일 수 없습니다.");
        }

        // 데이터 소스를 맵에 추가
        customDataSources.put(key, dataSource);

        // AbstractRoutingDataSource에 반영
        this.setTargetDataSources(customDataSources);
        this.afterPropertiesSet(); // 데이터 소스 변경 적용
    }

    /**
     * 현재 라우팅 키에 매핑된 데이터 소스를 반환.
     *
     * @return 현재 요청의 데이터 소스
     */
    public DataSource getCurrentDataSource() {
        String key = CONTEXT.get();
        if (key == null || !customDataSources.containsKey(key)) {
            throw new IllegalStateException("현재 라우팅 키에 해당하는 데이터 소스가 없습니다. (키: " + key + ")");
        }
        return (DataSource) customDataSources.get(key);
    }
}
✔️ Properties
👩💻 DataSourceProperties
@Slf4j
@Component
public class DataSourceProperties {
    public boolean setDataSource(HashMap<String, Object> param) {
        String driver = (String) param.get("driver");
        String type = (String) param.get("type");

        try {
            // 세션 로컬에 데이터 소스 키 설정
            String dataSourceKey = driver + "_" + type;
            RouterDataSource.setRoutingKey(dataSourceKey);

            log.info("DB 타입 및 프로필 설정 성공: {}", dataSourceKey);
            return true;
        } catch (Exception e) {
            log.error("DB 연결 설정 중 오류: {}", e.getMessage());
            return false;
        }
    }


    //user direct conn
    /**
     * 동적으로 데이터 소스를 설정합니다.
     * @param driverClassName 드라이버 클래스 이름
     * @param url 연결 URL
     * @param username 사용자 이름
     * @param password 비밀번호
     * @return 성공 여부
     */
    private final Map<String, DataSource> dataSourceCache = new ConcurrentHashMap<>();

    @Autowired
    private RouterDataSource routerDataSource; // RouterDataSource 주입

    public boolean setCustomDataSource(String driverClassName, String url, String username, String password) {
        try {
            // HikariDataSource 설정
            HikariConfig config = new HikariConfig();
            config.setDriverClassName(driverClassName);
            config.setJdbcUrl(url);
            config.setUsername(username);
            config.setPassword(password);

            String key = "test";

            HikariDataSource hikariDataSource = new HikariDataSource(config);

            // RouterDataSource에 추가
            routerDataSource.addCustomDataSource(key, hikariDataSource);

            // 현재 컨텍스트에 라우팅 키 설정
            RouterDataSource.setRoutingKey(key);

            log.info("Custom DataSource 등록 완료: (Key: {}, URL: {})", key, url);
            return true;
        } catch (Exception e) {
            log.error("Custom DataSource 등록 실패: {}", e.getMessage(), e);
            return false;
        }
    }
}
👩💻 DBProperties
@Getter
@Setter
@Builder
@ToString
@NoArgsConstructor
@AllArgsConstructor
public class DBProperties {
    private String url;
    private String id;
    private String password;
}
📌 Compare Result
양쪽 db의 조회결과를 담을 entity, model을 작성하고 이에 맞게 쿼리를 작성합니다.
✔️ dto
@ToString
@Builder
@Data
@AllArgsConstructor
@NoArgsConstructor
@Alias("COMPARE_ENTT")
public class Piggy2Entt {
    //compare
    private String statDate;
    private String deviceId;
    private String resourceUri;
    private String preValue;
    private String statValue;
}
@Getter
@Builder
public class Piggy2Model {
@JsonProperty("statDate")
@ApiModelProperty(value = "statDate",required = true)
private String statDate;
@JsonProperty("deviceId")
@ApiModelProperty(value = "deviceId",required = true)
private String deviceId;
@JsonProperty("resourceUri")
@ApiModelProperty(value = "resourceUri",required = true)
private String resourceUri;
@JsonProperty("preValue")
@ApiModelProperty(value = "preValue",required = true)
private String preValue;
@JsonProperty("statValue")
@ApiModelProperty(value = "statValue",required = true)
private String statValue;
}@Data
@AllArgsConstructor
public class CompareResult {
private boolean isSame; // 동일 여부
private String different; // 차이 문자열
private Map<String, Map<String, String>> diffKeySets; // 차이 문자열
private List<Sheet1Model> merge; // 병합 문자열
}@Getter
@Builder
public class CompareModel {
@JsonProperty("same")
@ApiModelProperty(value = "same",required = true)
private boolean same;
@JsonProperty("different")
@ApiModelProperty(value = "different",required = true)
private String different;
@JsonProperty("diffKeySets")
@ApiModelProperty(value = "diffKeySets",required = true)
private Map<String, Map<String, String>> diffKeySets;
@JsonProperty("stg")
@ApiModelProperty(value = "stg",required = true)
private List<Piggy2Model> stg;
@JsonProperty("prod")
@ApiModelProperty(value = "prod",required = true)
private List<Piggy2Model> prod;
@JsonProperty("mergeStgProd")
@ApiModelProperty(value = "mergeStgProd",required = true)
private List<Sheet1Model> mergeStgProd;
}@Getter
@Setter
@Builder
public class Sheet1Model {
// 엑셀을 그리기위한 모델
@JsonProperty("deviceId")
@ApiModelProperty(value = "deviceId",required = true)
private String deviceId;
@JsonProperty("resourceUri")
@ApiModelProperty(value = "resourceUri",required = true)
private String resourceUri;
@JsonProperty("statDate")
@ApiModelProperty(value = "statDate",required = true)
private String statDate;
@JsonProperty("prod_pre")
@ApiModelProperty(value = "prod_pre",required = true)
private String prod_pre;
@JsonProperty("prod_stat")
@ApiModelProperty(value = "prod_stat",required = true)
private String prod_stat;
@JsonProperty("stg_pre")
@ApiModelProperty(value = "stg_pre",required = true)
private String stg_pre;
@JsonProperty("stg_stat")
@ApiModelProperty(value = "stg_stat",required = true)
private String stg_stat;
}
✔️ query xml
compare은 임의로 지정한 1건의 데이터를 비교하는 용도로 작성하였고
compareAll은 전체 데이터를 비교하는 단순 전체 조회문입니다.
<?xml version="1.0" encoding="UTF-8"?>
<!DOCTYPE mapper PUBLIC "-//mybatis.org//DTD Mapper 3.0//EN" "http://mybatis.org/dtd/mybatis-3-mapper.dtd">

<mapper namespace="net.herit.rookieV2.features.piggy2.repository.Piggy2Repo">
    <select id="compare" resultType="COMPARE_ENTT">
        select
                to_char(STAT_DATE, 'yyyy-mm-dd HH24:MI') as statDate,
                DEVICE_ID AS deviceId,
                RESOURCE_URI AS resourceUri,
                round(START_VALUE,3) AS startValue,
                round(PREVIOUS_VALUE,3) AS preValue,
                round(STAT_VALUE,3) AS statValue
        <choose>
            <when test='searchGbn == "R"'>from IOT_DEVICE_STATUS_REALTIME_STATISTIC</when>
            <when test='searchGbn == "H"'>from IOT_DEVICE_STATUS_HOUR_STATISTIC</when>
            <when test='searchGbn == "D"'>from IOT_DEVICE_STATUS_DAY_STATISTIC</when>
            <when test='searchGbn == "M"'>from IOT_DEVICE_STATUS_MONTH_STATISTIC</when>
        </choose>
        WHERE 1=1
        and STAT_DATE between #{st} and #{ed}
        <if test='object != null and object.size() > 0 and !object.contains("")'>
            and OBJECT_ID IN
            <foreach collection="object" item="item" open="(" close=")" separator=",">
                #{item}
            </foreach>
        </if>
        <if test='device != null and device.size() > 0 and !device.contains("")'>
            and DEVICE_ID in
            <foreach collection="device" item="item" open="(" close=")" separator=",">
                #{item}
            </foreach>
        </if>
        <if test='instance != null and instance.size() > 0 and !instance.contains("")'>
            and INSTANCE_ID IN
            <foreach collection="instance" item="item" open="(" close=")" separator=",">
                #{item}
            </foreach>
        </if>
        ORDER BY DEVICE_ID, RESOURCE_URI, STAT_DATE ASC
    </select>
</mapper>
📌 Excel 파일 생성
조회까지 완료되었다면, 조회결과를 Excel 파일로 생성해보도록 하겠습니다.
요구사항은 아래와 같습니다.
- Byte[] 코드로 작성하여 postman으로 다운로드
- Cell은 A~I열로 제한
- 첫번째 row는 titlte 라인
- 첫번째 cell은 type 구분
prod-운영데이터, stg-검증데이터
- UniqueKey 기준은 statDate-deviceId-resourceUri
- UniqueKey 기준으로 서로다른 preValue, statValue를 엑셀 BackgroundColor로 표시
- UniqueKey가 동일하고, Value값이 다른경우 diffKeyValue List에 넣어서 추후 엑셀생성시 이용하여 cell배경색 변경
- H열에 엑셀 수식 추가
: stg_stat > prod_stat 인 경우(즉, stg 값이 더 크게 조회된 경우) 데이터가 잘 못 생성된 것으로 표시필요.
stg_stat < prod_stat은 오류가 아니나, 그 반대의 경우에는 오류데이터임으로
H열 DIFF란에 명확하게 표시해서 추후에 Ctrl-F로 "DIFF"를 검색해 오류데이터를 조회하기 쉽도록 추가한 함수입니다.
함수는 CellMaker 코드 내 createRowContent 메서드 내부에 아래와같이 작성했습니다.
// H열에 DIFF 수식 추가 - 검증 값이 더 큰 경우
Cell formulaCell = row.createCell(7); // H열 (인덱스 7)
int rowIndex = row.getRowNum() + 1; // Excel 행 번호는 1부터 시작
String formula = String.format("IF(OR(G%d=\"\", E%d>G%d), \"DIFF\", \"\")", rowIndex, rowIndex, rowIndex);
formulaCell.setCellFormula(formula); // 수식 설정
formulaCell.setCellStyle(contentStyle); // 수식 설정
엑셀파일 미리보기

✔️ API Controller + Service
postman으로 호출하게 될 API의 컨트롤러와 서비스를 작성해보겠습니다.
👩💻 Controller
@Slf4j
@Api(tags = "테이블 명세화")
@RequestMapping("/piggy2")
@RestController
public class Piggy2Controller {
    @Autowired
    private Piggy2Service piggy2svc;

    @Autowired
    private DataSourceProperties dataSourceProperties;
    @Value("${spring.config.activate.on-profile}")
    private String profile;

    @Autowired(required=true)
    private HttpServletRequest request;

    @Autowired
    private DataSource dataSource;

    @NonAuth
    @ApiOperation(value="01. 통계 조회", notes = "다중 db를 비교한 결과를 단순 json으로 표출", produces = "application/json", response = TableSpecResponse.Result.class)
    @ApiResponses({
            @ApiResponse(code = 200, message = "", response = TableSpecResponse.Result.class)
    })
    @PostMapping("/search")
    @LogTracer(apiAppType = "postman", logType = "API", apiClass = "PROC_TEST", svcClass = "JSON")
    public ResponseEntity<Response> searchTableSpec(@RequestBody @Valid Piggy2Request.Search req) throws Exception {
        Response response = null;

        HashMap<String, Object> param = new HashMap<>();
        param.put("driver", "piggy2");
        param.put("type", "prod");

        // DataSource 설정
        try {
            if (!dataSourceProperties.setDataSource(param)) {
                log.info("동적 데이터 소스 설정 실패");
                throw new CommonException(HttpResponseStatus.SYSTEM_ERROR);
            }
        } catch (Exception e) {
            log.info("데이터 소스 전환 오류");
            throw new CommonException(HttpResponseStatus.SYSTEM_ERROR);
        }

        param.put("searchGbn", req.getSearchGbn());
        param.put("st", req.getSt());
        param.put("ed", req.getEd());
        param.put("instance", req.getInstance());
        param.put("device", req.getDevice());
        param.put("object", req.getObject());
        response = piggy2svc.compareDatas(param);
        log.info(CommonUtil.responseToResponseBody(response));

        return new ResponseEntity<Response>(response, HttpStatus.OK);
    }

    @NonAuth
    @ApiOperation(value="02. 통계 excel", notes = "다중 db를 비교한 결과를 엑셀파일로 생성하여 다운로드 합니다."
            , produces = "application/json", response = TableSpecResponse.Result.class)
    @ApiResponses({
            @ApiResponse(code = 200, message = "", response = TableSpecResponse.Result.class)
    })
    @PostMapping("/excel")
    @LogTracer(apiAppType = "postman", logType = "API", apiClass = "PROC_TEST", svcClass = "JSON")
    public ResponseEntity<byte[]> downloadTableSpec(@RequestBody @Valid Piggy2Request.Search req) throws Exception {

        Response response = null;
        HashMap<String, Object> param = new HashMap<>();
        param.put("driver", "piggy2");
        param.put("type", "prod");

        // DataSource 설정
        try {
            if (!dataSourceProperties.setDataSource(param)) {
                log.info("동적 데이터 소스 설정 실패");
                throw new CommonException(HttpResponseStatus.SYSTEM_ERROR);
            }
        } catch (Exception e) {
            log.info("데이터 소스 전환 오류");
            throw new CommonException(HttpResponseStatus.SYSTEM_ERROR);
        }

        param.put("searchGbn", req.getSearchGbn());
        param.put("st", req.getSt());
        param.put("ed", req.getEd());
        param.put("instance", req.getInstance());
        param.put("device", req.getDevice());
        param.put("object", req.getObject());

        byte[] excelFile = piggy2svc.downloadSpec(param);
        HttpHeaders headers = new HttpHeaders();
        headers.setContentType(MediaType.APPLICATION_OCTET_STREAM);
        LocalDateTime now = LocalDateTime.now();
        DateTimeFormatter formatter = DateTimeFormatter.ofPattern("yyMMddHHmm");
        String formattedDate = now.format(formatter);
        String fileName = formattedDate + "_comparedata" + ".xlsx";
        headers.setContentDispositionFormData("attachment", fileName);
        headers.setContentLength(excelFile.length);

        return new ResponseEntity<>(excelFile, headers, HttpStatus.OK);
    }
}
👩💻 excel download service
@Slf4j
@Service
public class Piggy2Service {
    @Autowired
    private Piggy2Repo piggy2Repo;

    @Autowired
    private DataSourceProperties dataSourceProperties;

    @Autowired
    private Piggy2ImportExcelService createExc;

    public Response compareDatas(HashMap<String, Object> param) {
        Response response = null;
        FailModel failResponse = new FailModel();
        SuccessModel successResponse = new SuccessModel();
        successResponse.setCode(HttpResponseStatus.SUCCESS.getCode());

        List<Piggy2Entt> search = new ArrayList<>();
        List<Piggy2Entt> search2 = new ArrayList<>();
        List<Piggy2Model> result = new ArrayList<>();
        List<Piggy2Model> result2 = new ArrayList<>();

        try {
            search = piggy2Repo.compare(param);
        } catch (Exception e) {
            e.printStackTrace();
            return response = CommonRes.builder()
                    .rsp_cd(HttpResponseStatus.SYSTEM_ERROR.getResCode())
                    .rsp_msg(HttpResponseStatus.SYSTEM_ERROR.getDescription())
                    .build();
        }

        result = search.stream().map(ett -> Piggy2Model.builder()
                        .statDate(ett.getStatDate())
                        .deviceId(ett.getDeviceId())
                        .resourceUri(ett.getResourceUri())
                        .startValue(ett.getStartValue())
                        .preValue(ett.getPreValue())
                        .statValue(ett.getStatValue())
                        .build()).collect(Collectors.toList());

        // dataSet
        param.put("type", "stg");

        // DataSource 설정
        try {
            if (!dataSourceProperties.setDataSource(param)) {
                log.info("동적 데이터 소스 설정 실패");
                throw new CommonException(HttpResponseStatus.SYSTEM_ERROR);
            }
        } catch (Exception e) {
            log.info("데이터 소스 전환 오류");
            throw new CommonException(HttpResponseStatus.SYSTEM_ERROR);
        }

        try {
            search2 = piggy2Repo.compare(param);
        } catch (Exception e) {
            e.printStackTrace();
            return response = CommonRes.builder()
                    .rsp_cd(HttpResponseStatus.SYSTEM_ERROR.getResCode())
                    .rsp_msg(HttpResponseStatus.SYSTEM_ERROR.getDescription())
                    .build();
        }

        result2 = search2.stream().map(ett -> Piggy2Model.builder()
                .statDate(ett.getStatDate())
                .deviceId(ett.getDeviceId())
                .resourceUri(ett.getResourceUri())
                .startValue(ett.getStartValue())
                .preValue(ett.getPreValue())
                .statValue(ett.getStatValue())
                .build()).collect(Collectors.toList());


        CompareResult compareResult = this.compareResults(result, result2);

        CompareModel compareResultModel = CompareModel.builder()
                .same(compareResult.isSame())
                .different(compareResult.getDifferent())
                .diffKeySets(compareResult.getDiffKeySets())
                .prod(result)
                .stg(result2)
                .mergeStgProd(compareResult.getMerge())
                .build();

        response = Piggy2Response.Result.builder()
                .compare(compareResultModel)
                .build();


        return response;
    }

    // 엑셀 다운로드
    public byte[] downloadSpec(HashMap<String, Object> param) {
        Response response = null;
        FailModel failResponse = new FailModel();
        SuccessModel successResponse = new SuccessModel();
        successResponse.setCode(HttpResponseStatus.SUCCESS.getCode());

        byte[] writeExcel;
        try {
            // 조회결과
            List<Piggy2Entt> search = new ArrayList<>();
            List<Piggy2Entt> search2 = new ArrayList<>();
            List<Piggy2Model> prod = new ArrayList<>();
            List<Piggy2Model> stg = new ArrayList<>();

            try {
                search = piggy2Repo.compare(param);
            } catch (Exception e) {
                e.printStackTrace();
            }

            prod = search.stream().map(ett -> Piggy2Model.builder()
                    .statDate(ett.getStatDate())
                    .deviceId(ett.getDeviceId())
                    .resourceUri(ett.getResourceUri())
                    .startValue(ett.getStartValue())
                    .preValue(ett.getPreValue())
                    .statValue(ett.getStatValue())
                    .build()).collect(Collectors.toList());

            // dataSet
            param.put("type", "stg");

            // DataSource 설정
            try {
                if (!dataSourceProperties.setDataSource(param)) {
                    log.info("동적 데이터 소스 설정 실패");
                    throw new CommonException(HttpResponseStatus.SYSTEM_ERROR);
                }
            } catch (Exception e) {
                log.info("데이터 소스 전환 오류");
                throw new CommonException(HttpResponseStatus.SYSTEM_ERROR);
            }

            try {
                search2 = piggy2Repo.compare(param);
            } catch (Exception e) {
                e.printStackTrace();
            }

            stg = search2.stream().map(ett -> Piggy2Model.builder()
                    .statDate(ett.getStatDate())
                    .deviceId(ett.getDeviceId())
                    .resourceUri(ett.getResourceUri())
                    .startValue(ett.getStartValue())
                    .preValue(ett.getPreValue())
                    .statValue(ett.getStatValue())
                    .build()).collect(Collectors.toList());


            CompareResult compareResult = this.compareResults(prod, stg);

            CompareModel compareResultModel = CompareModel.builder()
                    .same(compareResult.isSame())
                    .different(compareResult.getDifferent())
                    .diffKeySets(compareResult.getDiffKeySets())
                    .prod(prod)
                    .stg(stg)
                    .mergeStgProd(compareResult.getMerge())
                    .build();

            // -------조회결과 끝

            // Excel 생성 로직 호출
            writeExcel = createExc.writeExcel(compareResultModel);
        } catch (Exception e) {
            e.printStackTrace();
            throw new CommonException(HttpResponseStatus.SYSTEM_ERROR);
        }

        return writeExcel;
    }
}
👩💻 excel download data
엑셀에 어떻게 뿌려질지 생각하면서 Model 구조를 잡아야합니다.
운영prod, 검증stg 데이터는 UniqueKey를 이용해 merge해서 엑셀로 뿌렸고
쿼리단에서 order by로 데이터순서를 미리맞춰놓았습니다.
isSame에는 양쪽 db가 크기도같고 데이터도 완벽하게 동일한경우 true가 담기고있습니다.
UniqueKey 값으로 비교하면서 Value값이 다른경우 diffKeySet에 담았습니다.
엑셀 생성단계에 Background color를 diffKeySet 정보를 이용하여 변경해줍니다.
아래의 코드는 서비스코드 내부에 추가해줍니다.
쿼리로 조회한 각각의 운영, 검증 결과(CompareModel)를 merge하고
diffKeySet을 생성하는 단계입니다.
private CompareResult compareResults(List<Piggy2Model> prod, List<Piggy2Model> stg) {
         log.info("데이터 동일성 검증..");

        boolean isSame = true; // 동일성 여부
        String different = "";
        List<Sheet1Model> mergeStgProd = new ArrayList<>();
        Map<String, Map<String, String>> diffKeySets = new HashMap<>();


        // 리스트 사이즈 비교
        if (prod.size() != stg.size()) {
            isSame = false;
            different = "리스트 크기가 다릅니다. result.size=" + prod.size() + ", result2.size=" + stg.size();
        }

        // 동일기준 : statDate, deviceId, resourceUri
        // 값 비교 : preValue, statValue
        // 병합 로직

        // 1. STG 데이터를 Map으로 전환
        Map<String, Piggy2Model> stgMap = stg.stream()
                .collect(Collectors.toMap(this::generateUniqueKey, Function.identity(), (a, b) -> b)); // 고유 키를 기준으로 Map 생성

        // 병합된 데이터 추적을 위한 Map (중복 확인용)
        Set<String> processedKeys = new HashSet<>();

        // 2. PROD 기준 병합 (순서를 유지)
        for (Piggy2Model prodItem : prod) {
            String prodKey = generateUniqueKey(prodItem);
            Piggy2Model stgItem = stgMap.get(prodKey);  // STG 데이터에서 매칭 데이터 가져오기

            // 병합 데이터 생성
            Sheet1Model mergedRow = Sheet1Model.builder()
                    .deviceId(prodItem.getDeviceId())
                    .resourceUri(prodItem.getResourceUri())
                    .statDate(prodItem.getStatDate())
                    .prod_pre(prodItem.getPreValue())
                    .prod_stat(prodItem.getStatValue())
                    .stg_pre(stgItem != null ? stgItem.getPreValue() : null)
                    .stg_stat(stgItem != null ? stgItem.getStatValue() : null)
                    .build();

            mergeStgProd.add(mergedRow); // 순서 유지
            processedKeys.add(prodKey);  // 병합된 키 추적

            // 값 비교 및 차이 기록
            if (stgItem != null) {
                Map<String, String> difference = new HashMap<>();
                /*if (!Objects.equals(prodItem.getPreValue(), stgItem.getPreValue())) {
                    difference.put("preValue", "prod: " + prodItem.getPreValue() + ", stg: " + stgItem.getPreValue());
                }*/
                if (!Objects.equals(prodItem.getStatValue(), stgItem.getStatValue())) {
                    difference.put("statValue", "prod: " + prodItem.getStatValue() + ", stg: " + stgItem.getStatValue());
                }
                // 차이가 있는 경우 기록
                if (!difference.isEmpty()) {
                    diffKeySets.put(prodKey, difference);
                }
            }
        }

        // 3. STG-only 데이터 처리 (순서 유지 필요 없음)
        for (Piggy2Model stgItem : stg) {
            String stgKey = generateUniqueKey(stgItem);
            if (processedKeys.contains(stgKey)) {
                continue; // 이미 병합된 데이터는 건너뜀
            }

            // STG-only 병합 데이터 생성
            Sheet1Model mergedRow = Sheet1Model.builder()
                    .deviceId(stgItem.getDeviceId())
                    .resourceUri(stgItem.getResourceUri())
                    .statDate(stgItem.getStatDate())
                    .prod_pre(null)
                    .prod_stat(null)
                    .stg_pre(stgItem.getPreValue())
                    .stg_stat(stgItem.getStatValue())
                    .build();

            mergeStgProd.add(mergedRow); // 병합 결과에 추가
            processedKeys.add(stgKey); // 병합된 키로 추적

            // STG-only 차이 기록
            Map<String, String> difference = new HashMap<>();
            difference.put("preValue", "prod: null, stg: " + stgItem.getPreValue());
            difference.put("statValue", "prod: null, stg: " + stgItem.getStatValue());
            diffKeySets.put(stgKey, difference);
        }

        // 4. 동일성 검증
        log.info("병합된 데이터 크기: {}, 차이 데이터 크기: {}", mergeStgProd.size(), diffKeySets.size());
        if (!diffKeySets.isEmpty()) {
            isSame = false;
            different = "데이터 차이가 존재합니다.";
        }


        return new CompareResult(isSame, different, diffKeySets, mergeStgProd);
    }

    // 고유 Key 생성
    private String generateUniqueKey(Piggy2Model model) {
        return model.getStatDate() + "-" + model.getDeviceId() + "-" + model.getResourceUri();
    }

    private String generateUniqueKey(Sheet1Model model) {
        return model.getStatDate() + "-" + model.getDeviceId() + "-" + model.getResourceUri();
    }


    private boolean areModelsEqual(Piggy2Model model1, Piggy2Model model2) {
        return Objects.equals(model1.getStatDate(), model2.getStatDate()) &&
                Objects.equals(model1.getDeviceId(), model2.getDeviceId()) &&
                Objects.equals(model1.getResourceUri(), model2.getResourceUri())
                ;
    }
👩💻 excel create
엑셀을 생성하는 큰 틀입니다.
sheet를 두개로 구성하고 싶다면, 여기서 sheet2를 작성하여 설정해주면 됩니다.
@Slf4j
@Service
@RequiredArgsConstructor
public class Piggy2ImportExcelService {
    private final Piggy2CellMaker cellMaker;
    private final Piggy2StyleMaker styleMaker;

    public byte[] writeExcel(CompareModel compareResult) {
        if (compareResult == null) return null;

        try (Workbook workbook = new XSSFWorkbook();
             ByteArrayOutputStream out = new ByteArrayOutputStream()) {

            // 시트 생성
            Sheet sheet1 = workbook.createSheet("Compare Data");

            // 제목 행 생성
            Row titleRow1 = sheet1.createRow(0);
            CellStyle titleStyle1 = styleMaker.getTitleStyle(workbook, sheet1);
            cellMaker.writeTitle1(titleStyle1, titleRow1);

            // 내용 작성
            CellStyle contentStyle1 = styleMaker.getContentStyle(workbook, sheet1);
            CellStyle differenceStyle1 = styleMaker.getDifferenceStyle(workbook, sheet1); // Highlight 스타일 추가
            CellStyle numberStyle = styleMaker.getNumberStyle(workbook, sheet1); // Highlight 스타일 추가
            cellMaker.writeContent1(compareResult, sheet1, contentStyle1, differenceStyle1,numberStyle, 1);

            // 열 너비 조정
            for (int i = 0; i < 8; i++) {
                sheet1.autoSizeColumn(i);
            }

            // 엑셀 데이터 Write
            workbook.write(out);

            return out.toByteArray();

        } catch (IOException e) {
            log.error("Excel 생성 실패", e);
            throw new CommonException(HttpResponseStatus.SYSTEM_ERROR);
        }
    }
}
👩💻 excel -cell maker
CompareModel에 담긴 양쪽 DB의 조회결과를 받아서 작성합니다.
Cell의 모양과 전체적인 엑셀 규격을 만드는 부분으로 가장 중요한 코드입니다.
@Component
@RequiredArgsConstructor
public class Piggy2CellMaker {

    // Title Row 작성
    public void writeTitle1(CellStyle titleStyle, Row row) {
        String[] titles = { "deviceId", "resourceUri", "statDate", "prod pre", "prod stat", "stg pre", "stg stat", "DIFF"};

        for (int i = 0; i < titles.length; i++) {
            Cell cell = row.createCell(i);
            cell.setCellValue(titles[i]);
            cell.setCellStyle(titleStyle);
        }
    }

    // Sheet1 Content 작성 (prod와 stg의 데이터를 순차적으로 작성)
    public void writeContent1(
            CompareModel compareModel,
            Sheet sheet,
            CellStyle contentStyle,
            CellStyle differenceStyle, // 다른 값을 가진 데이터를 강조할 스타일
            CellStyle numberStyle,
            int startRow
    ) {
        // 병합된 데이터
        List<Sheet1Model> mergeStgProd = compareModel.getMergeStgProd();
        Map<String, Map<String, String>> diffKeySets = compareModel.getDiffKeySets();

        int rowIndex = startRow;

        for (Sheet1Model rowModel : mergeStgProd) {
            Row row = sheet.createRow(rowIndex++); // 새로운 행 생성
            // mergeStgProd 내 데이터 설정 (diffKeySets 연동)
            createRowContent(rowModel, diffKeySets, row, contentStyle, differenceStyle, numberStyle);
        }
    }


    private void createRowContent(Sheet1Model model,
                                  Map<String, Map<String, String>> diffKeySets,
                                  Row row,
                                  CellStyle contentStyle,
                                  CellStyle differenceStyle,
                                  CellStyle numberStyle) {

        // 고유 키 생성
        String uniqueKey = generateUniqueKey(model);
        Map<String, String> fieldDiffs = diffKeySets.get(uniqueKey);

        // 기본 데이터 열 작성
        writeCell(row, 0, model.getDeviceId(), contentStyle);      // deviceId
        writeCell(row, 1, model.getResourceUri(), contentStyle);   // resourceUri
        writeCell(row, 2, model.getStatDate(), contentStyle);      // statDate

        // prod 및 stg 데이터를 순서대로 기록하며 차이점 강조
        writeCellDouble(row, 3, model.getProd_pre(), numberStyle);
        writeCellWithDiff(row, 4, model.getProd_stat(), fieldDiffs, "statValue", numberStyle, differenceStyle);

        writeCellDouble(row, 5, model.getStg_pre(), numberStyle);
        writeCellWithDiff(row, 6, model.getStg_stat(), fieldDiffs, "statValue", numberStyle, differenceStyle);


        // H열에 DIFF 수식 추가 - 검증 값이 더 큰 경우
        Cell formulaCell = row.createCell(7); // H열 (인덱스 7)
        int rowIndex = row.getRowNum() + 1; // Excel 행 번호는 1부터 시작
//        String formula = String.format("IF(E%d>G%d,\"DIFF\", \"\")", rowIndex, rowIndex);
        String formula = String.format("IF(OR(G%d=\"\", E%d>G%d), \"DIFF\", \"\")", rowIndex, rowIndex, rowIndex);
        formulaCell.setCellFormula(formula); // 수식 설정
        formulaCell.setCellStyle(contentStyle); // 수식 설정
//        writeCell(row, 7, formula, contentStyle);      // deviceId
    }

    // 하이라이트 적용된 셀 작성
    private void writeCellWithDiff(Row row, int cellIndex, String value,
                                   Map<String, String> fieldDiffs, String fieldName,
                                   CellStyle contentStyle, CellStyle differenceStyle) {
        Cell cell = row.createCell(cellIndex);

        if (value != null && !value.trim().isEmpty()) {
            cell.setCellValue(Double.valueOf(value)); // 값이 null이 아니면 Double로 변환
        } else {
            cell.setCellValue(value);
        }

        // 강조 스타일 적용 여부 확인
        if (fieldDiffs != null && fieldDiffs.containsKey(fieldName)) {
            cell.setCellStyle(differenceStyle);
        } else {
            cell.setCellStyle(contentStyle);
        }
    }

    // 기본 데이터 열 작성
    private void writeCell(Row row, int cellIndex, String value, CellStyle contentStyle) {
        Cell cell = row.createCell(cellIndex);
        cell.setCellValue(value);
        cell.setCellStyle(contentStyle);
    }

    private void writeCellDouble(Row row, int cellIndex, String value, CellStyle contentStyle) {
        Cell cell = row.createCell(cellIndex);
        if (value != null && !value.trim().isEmpty()) {
            cell.setCellValue(Double.valueOf(value)); // 값이 null이 아니면 Double로 변환
        } else {
            cell.setCellValue(value);
        }
        cell.setCellStyle(contentStyle);
    }

    private String generateUniqueKey(Sheet1Model model) {
        return model.getStatDate() + "-" + model.getDeviceId() + "-" + model.getResourceUri();
    }
}
👩💻 excel -style maker
위에 작성한 cell maker에 디자인을 입히는 코드입니다.
테두리나 셀의배경색 글씨체등을 이쪽에서 변경할 수 있도록 코드를 작성해놓고 cellMaker에서 호출하여 사용합니다.
서로다른 value간의 Background color를 변경해주기 위해 setFillForegreoundColor 사용해줬습니다
@Component
public class Piggy2StyleMaker {
    public CellStyle getTitleStyle(Workbook workbook, Sheet sheet) {
        CellStyle titleStyle = workbook.createCellStyle();

        Font titleFont = workbook.createFont();
        titleFont.setBold(true);
        titleFont.setFontHeightInPoints((short)10);

        titleStyle.setAlignment(HorizontalAlignment.CENTER); // 스타일인스턴스의 속성
        titleStyle.setFillForegroundColor(IndexedColors.LIGHT_YELLOW.getIndex());
        titleStyle.setFillBackgroundColor(IndexedColors.LIGHT_YELLOW.getIndex());
        titleStyle.setFillPattern(FillPatternType.SOLID_FOREGROUND);
        titleStyle.setBorderRight(BorderStyle.THIN); // 테두리 설정
        titleStyle.setBorderLeft(BorderStyle.THIN);
        titleStyle.setBorderTop(BorderStyle.THIN);
        titleStyle.setBorderBottom(BorderStyle.THIN);
        titleStyle.setFont(titleFont);

        sheet.setColumnWidth(0, 2500);
        sheet.setColumnWidth(1, 5000);
        sheet.setColumnWidth(2, 7000);
        sheet.setColumnWidth(3, 8500);
        sheet.setColumnWidth(4, 6500);
        sheet.setColumnWidth(5, 6500);
        sheet.setColumnWidth(6, 4500);
        sheet.setColumnWidth(7, 5000);

        return titleStyle;
    }

    public CellStyle getNumberStyle(Workbook workbook, Sheet sheet) {
        CellStyle numberStyle = workbook.createCellStyle();
        DataFormat format = workbook.createDataFormat();
        numberStyle.setDataFormat(format.getFormat("#,##0.000")); // 소수점 3자리 형식
        numberStyle.setAlignment(HorizontalAlignment.RIGHT); // 숫자는 오른쪽 정렬

        // 테두리 설정
        numberStyle.setBorderTop(BorderStyle.THIN);
        numberStyle.setBorderBottom(BorderStyle.THIN);
        numberStyle.setBorderLeft(BorderStyle.THIN);
        numberStyle.setBorderRight(BorderStyle.THIN);

        return numberStyle;
    }

    public CellStyle getContentStyle(Workbook workbook, Sheet sheet) {
        CellStyle contentStyle = workbook.createCellStyle();

        Font contentFont = workbook.createFont();
        contentFont.setFontHeightInPoints((short)10);

        contentStyle.setAlignment(HorizontalAlignment.CENTER); // 스타일인스턴스의 속성

        contentStyle.setBorderRight(BorderStyle.THIN); // 테두리 설정
        contentStyle.setBorderLeft(BorderStyle.THIN);
        contentStyle.setBorderBottom(BorderStyle.THIN);
        contentStyle.setBorderTop(BorderStyle.THIN);
        contentStyle.setFont(contentFont);

        sheet.setColumnWidth(4, 4500);
        sheet.setColumnWidth(5, 8000);
        sheet.setColumnWidth(6, 3500);

        return contentStyle;
    }


    /**
     * Piggy2 굵은 하단 테두리 스타일 생성
     */
    public CellStyle getThickBottomBorderStyle(Workbook workbook, Sheet sheet) {
        CellStyle style = workbook.createCellStyle();
        style.setBorderBottom(BorderStyle.THICK); // 굵은 테두리
        style.setBottomBorderColor(IndexedColors.BLACK.getIndex());
        return style;
    }

    // Different 셀의 배경색 스타일 (RGB 255:230:153)
    public CellStyle getDifferenceStyle(Workbook workbook, Sheet sheet) {
        CellStyle style = workbook.createCellStyle();

        // 배경색 설정
        style.setFillForegroundColor(IndexedColors.LIGHT_ORANGE.getIndex()); // RGB 255:230:153 색
        style.setFillPattern(FillPatternType.SOLID_FOREGROUND);

        // 기존 셀 스타일 복사 고려 (얇은 테두리)
        style.setBorderTop(BorderStyle.THIN);
        style.setBorderBottom(BorderStyle.THIN);
        style.setBorderLeft(BorderStyle.THIN);
        style.setBorderRight(BorderStyle.THIN);
        return style;
    }
}
📌 API 호출 결과
POST : http://localhost:8080/piggy2/excel
Body :
{
    "driver" : "piggy2",
    "searchGbn" : "R",
    "st" : "2025-04-01 00:00",
    "ed" : "2025-04-02 12:00"
    ,"instance" : ["15~"],
    "device" : ["v-ab3f~"],
    "object" : ["300","310"]
}
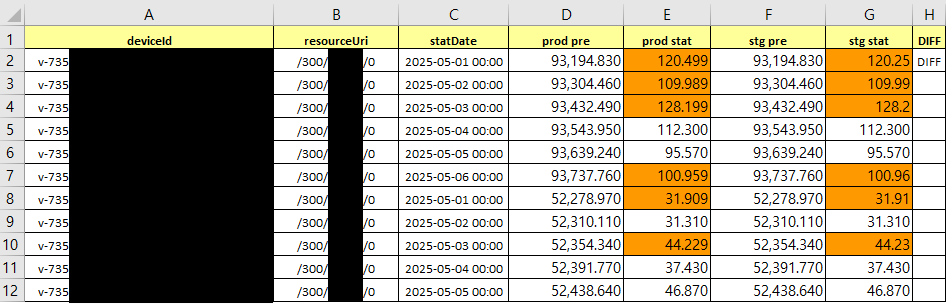
차례대로 prod(운영), stg(검증) 데이터를 동일 날짜(statDate) 기준으로 나열했습니다.
주황색으로 Background된 데이터는 statDate, deviceId, resourceUri로 묶은 UniqueKey끼리 확인해보면
양쪽의 값이 다른 것을 알 수 있습니다.
검증테스트를 위해서 생성한 툴이지만
이후에 데이터비교에 유용하게 쓰일 것 같아서 코드로 정리해봅니다.
'IT > Backend | API' 카테고리의 다른 글
| HTTP보다 빠르다! Named Pipe를 이용한 프로세스 간 통신(IPC) (1) | 2026.01.25 |
|---|---|
| API 과호출을 막는 방패 | Rate Limiter 설계와 구현 (0) | 2026.01.25 |
| HMAC-SHA256을 이용한 데이터 무결성 인증 (0) | 2026.01.24 |
| GitLab Repository API 사용방법 (Upload, Download) (2) | 2024.12.18 |


